

We’ve discussed keeping track of your purchases here on Milenomics before. The original cost tracking posts here and here on Milenomics were written less than a month into the blog’s launch. Since then I’ve come back to these posts dozens of times.
Today I’ll again ask you to keep track of your purchase, and in addition I’ll go over a tool I’ve created to hopefully help you do so. Finally I’ll ask for you, the readers, to help make that tool more useful for us all.
Purchase Tracking Serves Two Purposes
Purchase tracking should be used for two reasons–first to keep track of your spending. I know this isn’t a very “sexy” discussion of earning miles, but it is a necessary one. Bad habits die hard, and the absolute worst habit you could have in this game is not keeping track of your purchases.
The items we buy, and pay $200-$950 for feel like nothing. They’re a thin piece of plastic, or paper, and we shove them in our pocket feeling giddy that we’ve just earned $25, 500-1000 miles or more.
Almost every purchase we make as part of a Milenomics Mileage Run needs to then be cashed out. When you go to cash out, how do you know you’ve cashed out all your purchases? What if a card fell between your car seat, what if you juggled the cards you’ve drained and accidentally switched an empty card with a full one.
$500 gone. Down the drain.
Scale it up and it gets nightmarish. I’ve moved hundreds of thousands of dollars, and you better believe good record keeping is the key to making sure hundreds or thousands don’t fall through the cracks. I’ve had friends and associates jokingly tell me they found a $500 VR they didn’t know had money on it, or they checked a Gift card which was supposed to be empty and found $500 on it. One of these friends thought of this as a $500 windfall! How is not knowing you lost $500 only to find it later anything but a horrible $500 mistake, and possibly one of many?
This should scare you because it is scary.
The second reason for purchase tracking is to know if this hobby is even worth it to you. We’ve discussed knowing your costs as as a key to your redemptions. I’m sure some of you will discover that you’re spending much more to earn your miles (though your time and travel) than the miles end up being worth it in the end.
You may even decide, after a month or two of cost tracking that MMRs aren’t worth it to you. At least you’ll have data to back that decision up. If you decide to stop manufacturing miles you can use the same system to at least track spending for signup bonuses.
Cost tracking is a more advanced form of purchase tracking–and one which I’ve included in the below purchase tracking system. Even if you decide not to keep track of your time, I’d like you to consider it. Doing so will likely help you cut out unprofitable actions. Those tasks which take so much time, and earn so little miles that I consider them mile-negative, that is, the time you put into them costs more than the miles you get out.
Enough Already,Lets Get Down to Business
With all of this out in the open let’s get to the purchase tracking system. I was asked on twitter by Kat who writes Will Run for Miles the following:
@Saverocity #milemadness @Milenomics a topic I’d like to see covered is how u organize/keep track of MS – show us ur spreadsheet set up
— Will Run For Miles (@katruns26point2) May 6, 2014
One thing about keeping track of spending is everyone does things differently. I traditionally only use a spreadsheet, however Milenomic Jason on Facebook inspired me to work on something a little more user friendly, culminating in today’s post. (H/T Jason) Today’s attempt is at creating a canvas which you can modify and change. I’m releasing this as a beta product of sorts, and one which you can modify to fit your own needs.
Note: Any system only works if you log everything you do. Get into the habit of inputting your purchases while you sit in the parking lot–and you’ll end up having a true record of all your spending. Without a complete snapshot you might as well not use the cost tracking form.
The system I’ve created has two parts:
A front-end, which takes your input. A live version of this is here:

Do not put sensitive (real) card information into this sample form:
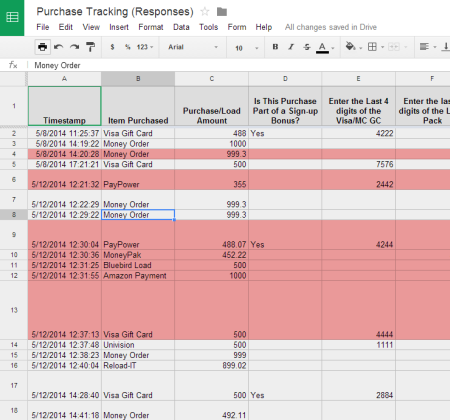
And a back-end which stores the data:
![]()

We’ll walk through both of these today, talk about how to modify them for your own use, and talk about using them to balance at the end of the month.
Business in the Front:
The above live input form can also be accessed here. Your initial input should be the item you’ve purchased. With most purchases you’ll then be asked for the last 4 digits of the card. These four digits, plus the time and date of purchase (and the amount) should be unique enough for you to track the cards, provided that you do other tracking techniques as well such as keeping receipts easily accessable.
The form automatically dates, and time stamps your input. This will also help you to be able to tie a purchase to a receipt. If you remember you went to the store last week, but don’t recall what you bought, you can look up that information quickly and efficiently (more on data look-ups later).
The form will prompt you for different information depending on what item you buy. A brief how-to for each type of purchase currently in the form is as follows:
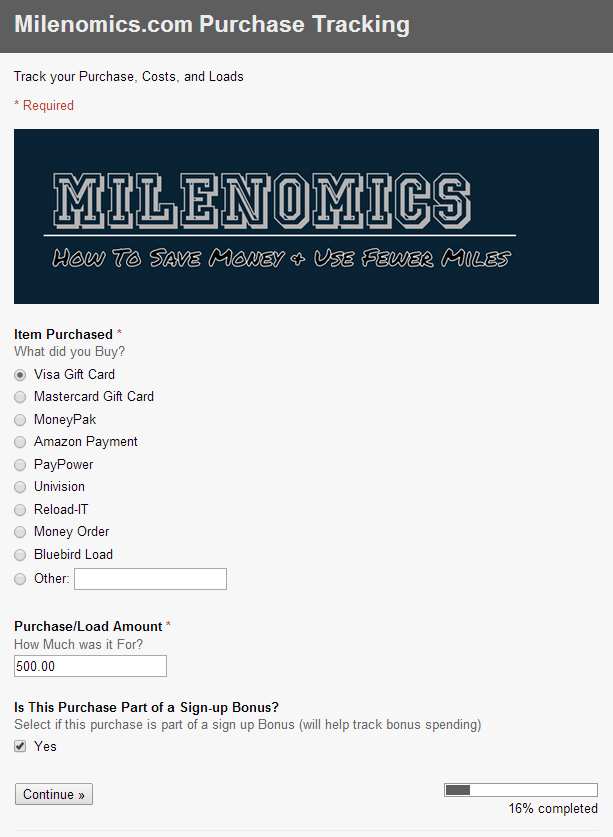
Visa/MC Gift Card
Input the type of Card and the amount of the purchase on the first screen:
From here once you click next you’ll be prompted to input the last 4 digits of the Gift Card itself:
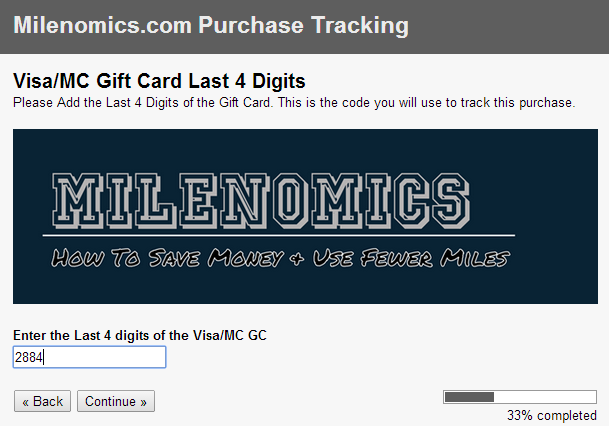
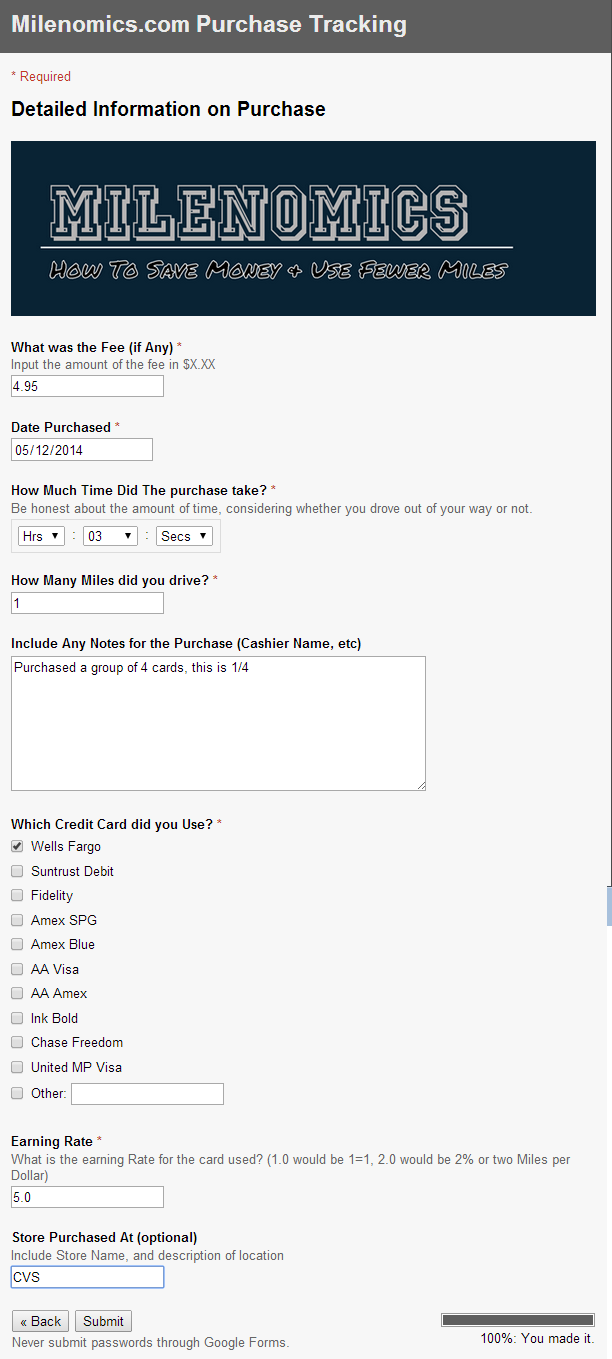
Clicking Continue you’re then taken to the Detailed Information section of the form, where you input the fees (If any), the date of purchase, and the card you used to make the purchase. In addition you need to input a earning rate for the purchase. The earning rate is the multiplier the card you used has for that specific purchase. For a 1x card this would be 1.0, a 2x Card 2.0, a 3x card 3.0, and so on:
Reload-it, Green-Dot Moneypak
The first step is identical as the above, so I’ll skip a screenshot. Selecting either Reload-it or GD Moneypak will then bring you to the following page:
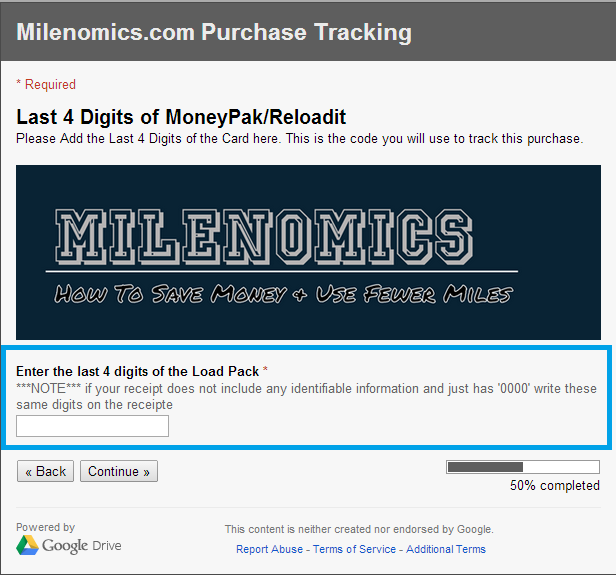
From here you’re presented with the same Final Detailed information form as above, asking you for date of purchase as well as time and travel, type of card and earning rate.
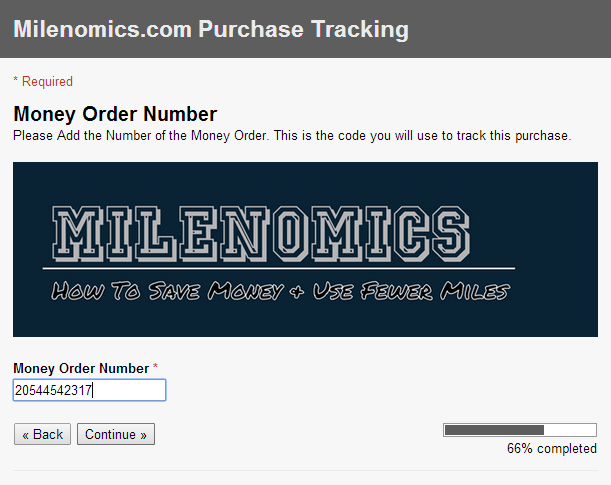
Money Order Purchase
Again, the first sheet is identical, with the exception being you’ll want to select “Money order” from the list. Doing so brings you to a form asking you for the complete money order number:
Once you’ve entered this you’ll be Presented with the Detailed Information form, similar to the one above. Something I want to highlight specific to Money Order purchases is the Card used and earning rate section:

I’ve included an “other” field for these types of purchases where you bought the Money order with a prepaid card. In that case you’ll want to put the name and 4 digit code for the card used to buy this money order. In addition you’ll want your earning rate to be 0.00 (0%) because you haven’t earned any miles with this purchase. 0.00 purchases are pure cash-out transactions. If you use more than one card include more than one set of 4 digit card numbers.
Bluebird Load
When you use this form for Bluebird load tracking you’re presented, again, with the same first sheet. Selecting a Bluebird load and inputting the total load amount then takes you to the following form:

Where you can input information on the load, and even multiple card numbers if you did a split-tender swipe.
I have made time spent and miles driven mandatory fields, I know some of you might not want to track them–but I suggest you do. Once you click submit on any of the above forms you’re done, and are given the option to input another item.
If you do nothing else–just keep a log of your purchases, so you know what you’ve spent. Also any purchases which are part of a new card spending requirement can be tagged as such–and you can see when you’ve crossed that spending threshold.
Party in the Back
The backend of this is a simple spreadsheet. The benefit of having a spreadsheet is that you can use this as a ledger of sorts, and cross off items you’ve taken care of unloading. I note items when I cash them out, and balance at month end–going through and highlighting anything which I’ve found to match with bank and Credit card statements. Anything not highlighted means I need to look into why it hasn’t been cashed out yet.

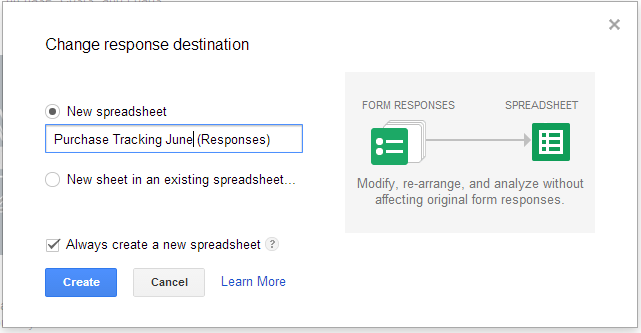
After the month is over you can save a new spreadsheet for the next month by editing the form, and going to the Responses menu and selecting “Change Response Destination.”
Saving this Form to Use for Your Own Purchases
It is incredibly important you follow these directions to obtain your own copy of this tracking sheet.
I’ve built this to run on google docs. I’m assuming everyone already has an account–but if you don’t you’ll need one. In order to use this form for your own responses you need to click on the following link:
https://docs.google.com/forms/d/1jPYGusPaYGF2DLi_L06XYgF0V-nD4A5f4RKUkkok3o8/edit?usp=sharing
Which should open the form for you to be able to edit. Yes, I am allowing the entire internet to edit this form. This could mean someone ruins it–and changes a bunch of options. I’m hopeful this is not the case. After you’ve clicked on the form you need to do the following:
![]()
Once you’ve saved a Copy you’ll see that copy in your own Google Drive. After you’ve done that, click on the file in your drive and load it:
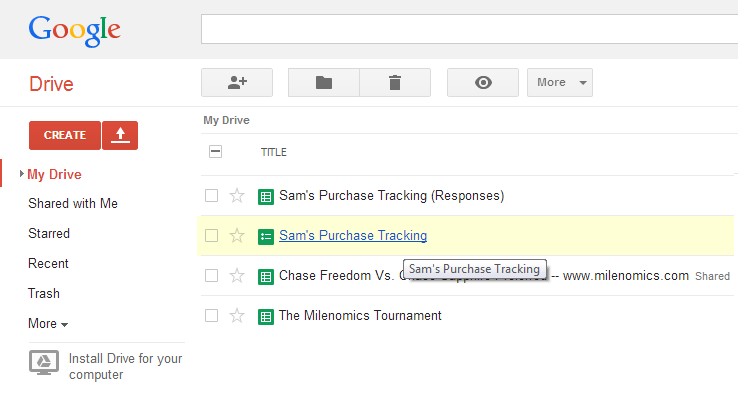
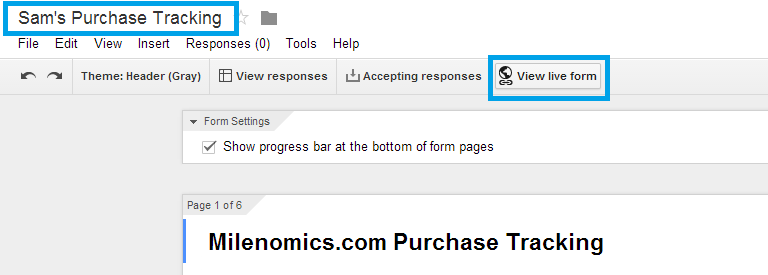
Once you see your own copy of the form in your drive, click on it, and load the form (to edit). Ensure that the top of the form says “(Your Name) Purchase Tracking”:
This is also the place where you can edit your form, taking out the Milnomics logo adding different options, and personalizing it for your own purchases. Whatever items you add you will see similar fields in your cost tracking spreadsheet.
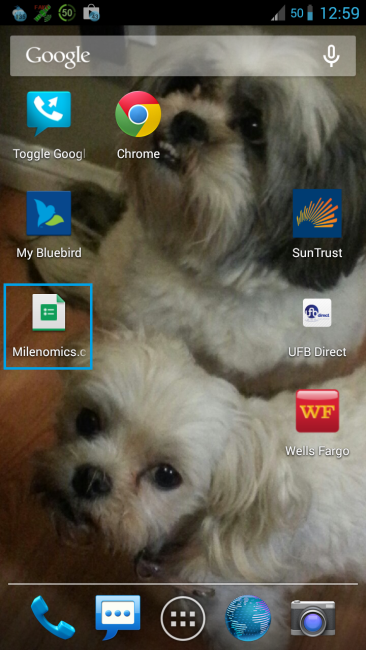
Clicking “View Live form” will take you to your actual form. From there it is as simple as making a bookmark of this form, and pulling it up whenever you want to input a purchase. Android and iPhone users can also add a bookmark to their home screens:
Let’s Be Mindful of Others
A limitation of Google Docs is that with Forms I cannot share a form without giving you editing capabilities. This means someone out there could get cute and edit the above form. If that happens I’ll have to take down the form, instead put up a sign up sheet and email out links to those of you who would like to use this system.
I worked hard on putting this together for my readers, please don’t ruin the form for others.
Internet, show me what you’re made of, I believe in you!
Leave a Comment for Added Features
I’ve tried to make this form basic enough for you to customize it however you might want to–but also functional as-is. If you’d like something added–or need help with it, let me know. I’ll be on Vacation the rest of this week–so I may be slow in responding. I usually mention getting in touch with me on Twitter, or Facebook, but in this instance email is probably best: Samsimontravel@gmail.com
Best of luck,
Sam